How To Format Page Number In Word 2011 For Mac
Posted : admin On 14.02.2019On the Insert tab, click the Page Number icon, and then click Remove Page Numbers. Note: If the Remove Page Numbers button is not available, double-click in the header or footer, select the page number, and press Delete. In the top bar of your screen, click Insert/Page Numbers then adjust settings for position and alignment. Be sure to uncheck Show number on first page 7. Click Format then check the radio button for Start at and type in the number of the page PRECEDING THE PAGE where you really want to begin your numbering. This article is going to teach you the basics of adding page numbers to a Word document, using Word 2007 or Word 2010.Later articles in the series will tackle more complicated topics such as mixing Roman and Arabic numerals and making sure your first page doesn’t have a number if you don’t want it to.
In this example I am using the following structure: Page 1 - title page Page 2 - contents page Page 3 - real document starts Break => Section Break (next page) Do the same thing for the contents page. Now your document has 3 sections and when we insert page numbering it will only number that section. Step 2: Insert the Page Numbers Navigate to the first page you want numbered (page 3 in my example). Click Insert => Page Numbers Ensure ‘show number on first page’ is checked Click Format Under ‘page numbering’, select Start At and enter “1” That’s it! You can now update your contents page and it will refer to your shiny new page number format. This took me a long time to work out.
• Click Set As Default, as shown in Figure F. Figure F Use this setting to reduce extra white space between paragraphs. 9: Save formatted text as AutoCorrect entries AutoCorrect reduces data entry and corrects typos, but it can also apply formatting.
Next to AutoRecover file location:, click Browse to choose the folder where you want Word to save your AutoRecovered files. Other versions of Word. In Word 2003, from the Tools menu, select Options. In Mac OS X versions of Word, from the Word menu, select Preferences. In the window that opens, click File Locations. Now you should see the “Microsoft Word Backup Document”, or “.wbk” file. Select the file and click “Open”. The “.wbk” file opens in Word and you can make any changes you want to it, just like you do in regular Word documents. Click the “File” tab and then “Save As” to save the backup document as a “.docx” file. AutoSave is a different feature which automatically saves your file as you work - just like if you save the file manually - so that you don't have to worry about saving on the go. On the Mac, AutoSave is available in Excel, Word, and PowerPoint for Office 365 subscribers. When AutoSave is turned on AutoRecover files are rarely needed. 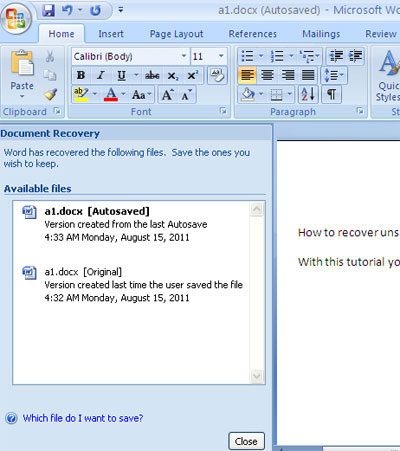 Backup documents Word 2016 Mac Until recently (beginning of June 2018), with the 'Always create backup copy' preference turned on, when I work on a document, Word used to make a folder with the same name of my document and then create copies of my document with the word Backup in the title inside that new folder.
• Cross platform between Linux, Windows, OS X and FreeBSD • Display songs, Bible verses, presentations, images and more • Control OpenLP remotely via the Android remote, iOS remote or mobile web browser • Quickly and easily import songs from other popular presentation packages • Easy enough to use to get up and running in less than 10 minutes. 
In the 'Text' area, select Date & Time. Uncheck Update automatically if it is checked, and then click OK. The date will be inserted into your document at the location of the cursor.
• Click anywhere on the page that you want to start the new section, or click anywhere in a section to add a section after it. • Click in the, then click the Section tab at the top of the sidebar. • Click the “Create a new section” pop-up menu and choose where to start the section. • If the document uses, click the “Section starts on” pop-up menu and choose the page where the new section starts: • Next Page: Starts the section on either a left or right page, whichever comes next in the document. • Right Page: Starts the section on the first right page.
To close the header or footer, on the Header & Footer tab, click Close Header and Footer, or double-click anywhere outside the header and footer area. Add page numbers • On the View menu, click Print Layout. • On the Document Elements tab, under Header and Footer, click Page #. • Select the options that you want. Position page numbers anywhere on the page Word inserts page numbers in frame, which you can position anywhere on the page. • On the View menu, click Print Layout. • On the Insert menu, click Page Numbers, and then click OK.

How to Setup Line Spacing to Double Spaced: • Under Spacing => click on “1.0 – Single” and choose “ 2.0 – Double“. How to Enter the First Page Information: • Type your full name => press Enter. • Type your professor’s name => press Enter. • Type course title => press Enter. • Type your paper’s due date => press Enter. • Click on the Align Center icon on the formatting toolbar (to center your blinking cursor) => Type the title of your paper, capitalizing the first letter and all major words and proper nouns. Do not use italics, boldfaced type, underlining, or all caps to format your title.